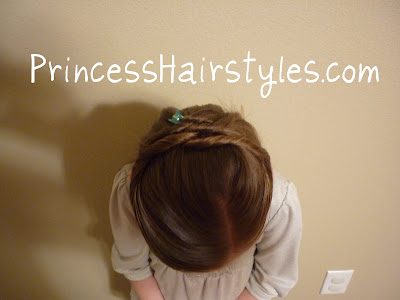
I actually made a video showing how to do this technique all the way down her head (kind of like a twisted looking french braid) and it turned out so beautiful! Unfortunately that video will be lost in cyberspace forever. :( If you want to do it, I bet you could figure it out though. Just keep going with this twisting technique all the way down. And if you do.... please, please post a picture to our facebook page so we can see it!
So anyway, enough rambling and back to the quick and easy twisty hair style.....
 Start by making a part on the side (or middle if you prefer.) Then take a section on one side and start twisting...
 Twist it over to the other side of her head and secure it into place by taking a small chunk of hair where you want the twist to lie and add an elastic.
 Next, take a section on the opposite side and twist.
 As you're securing this one in place (the same way you did the first one) try to place it so that the twist is covering up the previous elastic.
 Continue switching sides and twisting/securing as you go. This next picture is showing the 3rd twist I made.
We ended up doing 5 total twists this time. On the last elastic, I added a clip

The finished look from the side......
 And the top....
 This hairstyle would look cute with the bottom curled in my opinion. But of course, we didn't have time for that the day we did this one.
 If you want to use bobby pins instead of rubber bands, you could do that too. For me, rubberbands seem to stay more secure and are easier to add. Do whatever works best for you!


I love this hairstyle! Looks complicated, but yet it's so easy and simple. Thanks for another great hairdo.
ReplyDeleteVery pretty, I will definitely be trying this one!
ReplyDeleteThat's gorgeous! I may just have to try the "all the way down" one... hm....
ReplyDeleteI love this one!
ReplyDeleteI recently found your blog and have been having a lot of fun trying your creative hairstyles on anyone who will sit still long enough for me. This is a beautiful hairstyle and I will definitely be trying it...
ReplyDeleteI love this! And, it looks like it can work for a tween. Thanks for sharing.
ReplyDeletethis hairstyle was awesome!I have been searching thru your sight and love it!
ReplyDeleteit's nice well done it's look like difficult but when you do it is so easy thank's for this hair style
ReplyDelete